
Database actions - PAD

  POWER AUTOMATE DESKTOP - DATABASE Pre-Requisites Power Automate Desktop Access to database  Under the database action, we have only three sub actions, namely: Open SQL connection Execute SQL statement  Close SQL connection Open SQL Connection The first step is to connect to the database. So, we will use the Open SQL connection action and provide a connection string to establish the connection (the connection string in the video is a sample). When the connection is successful, the connection details is stored in a variable during execution. Execute SQL statement This action can be used to execute SQL queries. Here, I am using select query and the result is stored in a variable of type datatable. Close SQL connection It is a best practice to always close the database connection once the required queries are executed. YAY! BONUS!😮 How to execute a stored procedure using database action? Stored Procedure without arguments Stored Procedure with arguments (Comma separated incase of many a

Power Automate Array Variable

 ARRAY VARIABLES


A variable is a storage space where we can store any type of value. Here, we are gonna explore how to store & access Array variables.

To understand how array variables work, let's use this example of an array:
["FRIENDS", "Money Heist", "Squid Game", "The Big Bang Theory", "Brooklyn 99"]


 PRE-REQUISITE


Let's get started!

STEP 1: Create an Instant Cloud Flow with a Manual Trigger.
STEP 2: Click on "+New Step". Search and select "Variable".
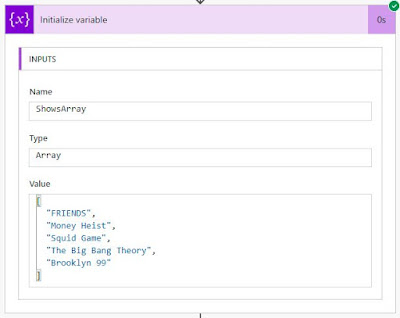
STEP 3: To create a variable, select "Initialize Variable".

Name: ShowsArray
Type: Array
Value: ["FRIENDS", "Money Heist", "Squid Game", "The Big Bang Theory", "Brooklyn 99"]
Initialize Array Variable In Power Automate


STEP 4: Click on "+New Step". Search and select "Append to array variable".
Append to array variable


STEP 5: Select the Array variable and also add a value to be appended.
Name: ShowsArray
Value:  Lucifer
Append to array variable


STEP 6: To check if appending a value worked, let's use compose and test the flow.
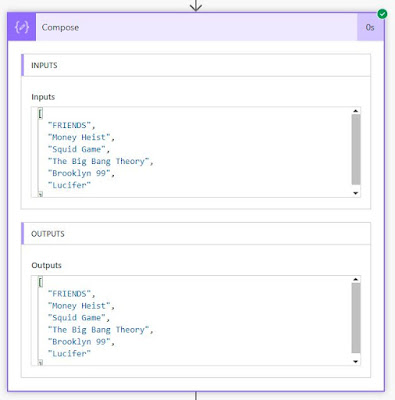
In new step, search and select "Compose". In Inputs, select "ShowsArray" from the dynamic content.
Compose and select Dynamic Content


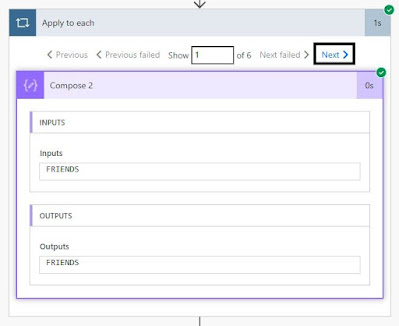
STEP 7: It's time to iterate through each item in the array.
In a New Step, Search "Control" and Select "Apply to each".
Apply to each


STEP 8: In "Select an output from previous step", select "ShowsArray", the array variable.
Each item in Array


STEP 9: We use "Compose" action, to see us iterating through the Array Variable.

Iterating through an Array


STEP 10: To access a particular value among the Array, lets use Compose and the Expression Tab.

Since the Index of array starts from 0, the Index 2, gives us the 3rd value in the Array.

Formula sort a look like this: variables('variablename')[n]

Array Index


It's time to save and test the flow and see how it works!

We can expand each action to see the results of variable.


Screenshots of the Tested Flow


Array variable


Append a value to Array

Loop through array

3rd value in Array


That concludes Array variable!


Please reach out or leave a comment in case of doubts, and I will get back asap.


Comments

Popular posts from this blog

Cloud Flow - Add a new row to Dataverse

  ADD A NEW ROW TO DATAVERSE TABLE - POWER AUTOMATE FLOW Hey Guys! Previously, I showed you how to add a new data row into a Dataverse table using Canvas App, if you missed or wish to review it, here's a link to it 👉 Pizza Table (Canvas App) 👈 In this one, we learn how to add a row to the same table using an Instant Cloud Flow. PRE-REQUISITE Login to  Power Automate I will be using the Pizza Table which I created earlier, it must be available in the Dataverse. If you have not done this already, please use this link to create it 👉 Pizza Table . As an alternative, you may also choose to use any other table from Dataverse. STEP 1: Create a new Instant Cloud flow which can be triggered manually. STEP 2:  Add a new step to Add a new Row in Microsoft Dataverse. STEP 3:  Search and choose Pizzas  table. STEP 4:  Click on Show Advanced Options and add the values shown in the screenshot below. STEP 5:  Save the flow and Test it! Once the flow has run successfully, we have to check if tha

Database actions - PAD

  POWER AUTOMATE DESKTOP - DATABASE Pre-Requisites Power Automate Desktop Access to database  Under the database action, we have only three sub actions, namely: Open SQL connection Execute SQL statement  Close SQL connection Open SQL Connection The first step is to connect to the database. So, we will use the Open SQL connection action and provide a connection string to establish the connection (the connection string in the video is a sample). When the connection is successful, the connection details is stored in a variable during execution. Execute SQL statement This action can be used to execute SQL queries. Here, I am using select query and the result is stored in a variable of type datatable. Close SQL connection It is a best practice to always close the database connection once the required queries are executed. YAY! BONUS!😮 How to execute a stored procedure using database action? Stored Procedure without arguments Stored Procedure with arguments (Comma separated incase of many a

Power Automate Object Variable

OBJECT VARIABLE A variable is a storage space where we can store any type of value. Here, we are gonna explore how to create, manipulate and access an Object variable. For this post, I am going to create the below object (Key-Value Pairs): {     "FirstName":"Bugs",     "LastName":"Bunny",     "Location":"Earth" } Then I will update the "Location" Key to store the value "America" using "setProperty" function. Lastly, I will also try to access the value using the Key name. Pre-Requisite Please log-in to  Power Automate  or  Power Platform  with your Work-School account STEP 1: Create a manually triggered Instant cloud flow. STEP 2:  Add a new step > "Initialize Variable", to create an object variable. Give it a name, type as Object and an initial value. STEP 3:  Next, I will change the Location property of the Object, from Earth to America, using the Compose Action and setProperty() fun