
Database actions - PAD

  POWER AUTOMATE DESKTOP - DATABASE Pre-Requisites Power Automate Desktop Access to database  Under the database action, we have only three sub actions, namely: Open SQL connection Execute SQL statement  Close SQL connection Open SQL Connection The first step is to connect to the database. So, we will use the Open SQL connection action and provide a connection string to establish the connection (the connection string in the video is a sample). When the connection is successful, the connection details is stored in a variable during execution. Execute SQL statement This action can be used to execute SQL queries. Here, I am using select query and the result is stored in a variable of type datatable. Close SQL connection It is a best practice to always close the database connection once the required queries are executed. YAY! BONUS!😮 How to execute a stored procedure using database action? Stored Procedure without arguments Stored Procedure with arguments (Comma separated in...

Instant Cloud Flow


Instant Flow - Button Click


In this post, we are going to attempt triggering an instant flow by clicking on a button in the Power Automate mobile App!


Pre-requisite

Requirement (For fun): When I click a button in my Power Automate mobile app, I want to receive a notification that displays the message "You Are Cute".

This is a very simple exercise and an easy one to understand about how an Instant Flow works.

Step 1: Create an Instant cloud flow in your Power Automate.


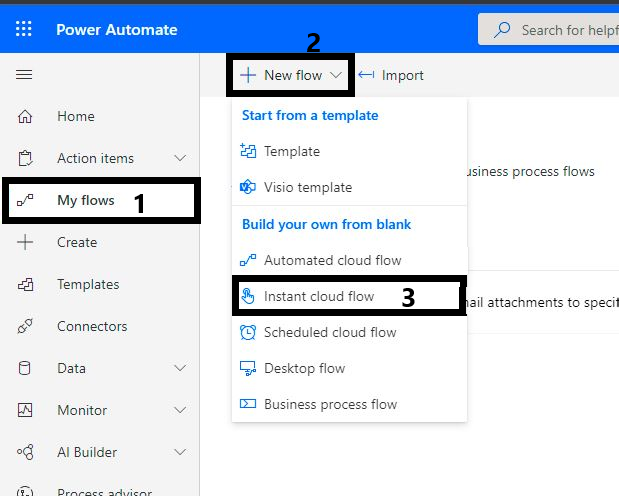
Step 2: Name your flow, Choose "Manually trigger a flow" and click "Create".
Don't hesitate to try out all the other triggers in the list.


Step 3: Click "+New Step" to add new step.


Step 4: Search "Delay" and select "Delay: Schedule"


Step 5: Give a Delay of 10 Second. Add New Step.


Step 6: Search Notifications and select "Send me a mobile notification: Notifications". Create a connection if asked.


Step 7: Enter "YOU ARE CUTE" for Text and Save the Flow.
A quick note: You may also add links to a website or app in the notification for quick access.


TEST YOUR FLOW

Time to open your Power Automate/Flows mobile app and test the flow. When you navigate to the "Buttons" page, you will find a circular button that is named after your flow. If you click on it, you will receive a mobile notification in 10 seconds.

Side Note: You may also use the readily available Template "Send myself a reminder in 10 minutes" to quickly create and use this flow!

Please leave a comment if you have any doubts and I will get back as soon as possible.

Comments

Popular posts from this blog

Database actions - PAD

  POWER AUTOMATE DESKTOP - DATABASE Pre-Requisites Power Automate Desktop Access to database  Under the database action, we have only three sub actions, namely: Open SQL connection Execute SQL statement  Close SQL connection Open SQL Connection The first step is to connect to the database. So, we will use the Open SQL connection action and provide a connection string to establish the connection (the connection string in the video is a sample). When the connection is successful, the connection details is stored in a variable during execution. Execute SQL statement This action can be used to execute SQL queries. Here, I am using select query and the result is stored in a variable of type datatable. Close SQL connection It is a best practice to always close the database connection once the required queries are executed. YAY! BONUS!😮 How to execute a stored procedure using database action? Stored Procedure without arguments Stored Procedure with arguments (Comma separated in...

Cloud Flow - Add a new row to Dataverse

  ADD A NEW ROW TO DATAVERSE TABLE - POWER AUTOMATE FLOW Hey Guys! Previously, I showed you how to add a new data row into a Dataverse table using Canvas App, if you missed or wish to review it, here's a link to it 👉 Pizza Table (Canvas App) 👈 In this one, we learn how to add a row to the same table using an Instant Cloud Flow. PRE-REQUISITE Login to  Power Automate I will be using the Pizza Table which I created earlier, it must be available in the Dataverse. If you have not done this already, please use this link to create it 👉 Pizza Table . As an alternative, you may also choose to use any other table from Dataverse. STEP 1: Create a new Instant Cloud flow which can be triggered manually. STEP 2:  Add a new step to Add a new Row in Microsoft Dataverse. STEP 3:  Search and choose Pizzas  table. STEP 4:  Click on Show Advanced Options and add the values shown in the screenshot below. STEP 5:  Save the flow and Test it! Once the flow has run success...

On Block Error - PAD

POWER AUTOMATE DESKTOP - ON BLOCK ERROR During development, testing or the actual execution of the desktop flows, we might get into errors. When error occurs, we might want the flow to exit gracefully, run another subflow or even set a value a variable. This is exactly why we use On Block Error action for. Here is a quick example on ways to use On Block Error:   We place the other actions within the "On Block Error" and "End" actions: Actions within On Block Error, There are options to Continue Flow Run or Throw Error. Throw Error will throw the error and stop the flow during run-time. If the Continue Flow Run option is chosen, the action can be repeated, we can skip to a Label or end of block or beginning of block or even go to the next action. If we have logical actions like division by 0 or trying to access a out-of-bound index from a list or datatable, then we can toggle on the "Capture unexpected logic errors" option. We also have the option to "...